Whichever cloud you are using, it is recommended that you deploy your Single Page Application in a bucket. Indeed, using managed services ensures your scaling and your availability. I am going to explain why in some cases you might want to do otherwise. In this blog, we have already explained to you how to migrate applications to Kubernetes. But for migrating Single Page Applications, there are a few other key points you want to be aware of 😉.
Warnings and prerequisites
I have already performed this migration from GCS to GKE, with a React application. Even if most of what I am going to explain in this article can probably be applied to other Cloud providers and other frontend frameworks, I am going to specifically explain how to do it in the GCP case.
To successfully manage this migration, you need to have a Kubernetes cluster that is using the 1.23 version at least. At the time of writing this article, this means you have to use the rapid release channel of GKE.
I will also explain to you how to configure an NGINX proxy with your built frontend. You can use any other proxy technology, like Caddy, if you are more comfortable with it.
The reasons why you should do the migration
Standardize your workload Kubernetes
If you are reading this article I assume you already using a Kubernetes cluster. Well, you might want to standardize how you deploy all your workloads. In addition, if you are using a GitOps tool, such as ArgoCD, it will allow you to have a unique source of truth of state and versions of all your workloads.
The mandatory 404 of GCS
When you use a framework, such as React, you need to build your frontend before deploying it. Basically, it optimizes your codebase and generates a single html file (index.html) and a bunch of javascript and css files. Those files are not human-readable.
As opposed to frontend designed without such a framework, you do not have one html file per page. The compiled index.hmtl file is able to do all the routing. That is the reason it is called a Single Page Application (SPA).
If you want to deploy this frontend with GCS, you configure your bucket as a website and set the main page to index.html. You also set the error page to index.html since no other page than index.html exists.
Going to a non-root route of your frontend goes as described in the next illustration.
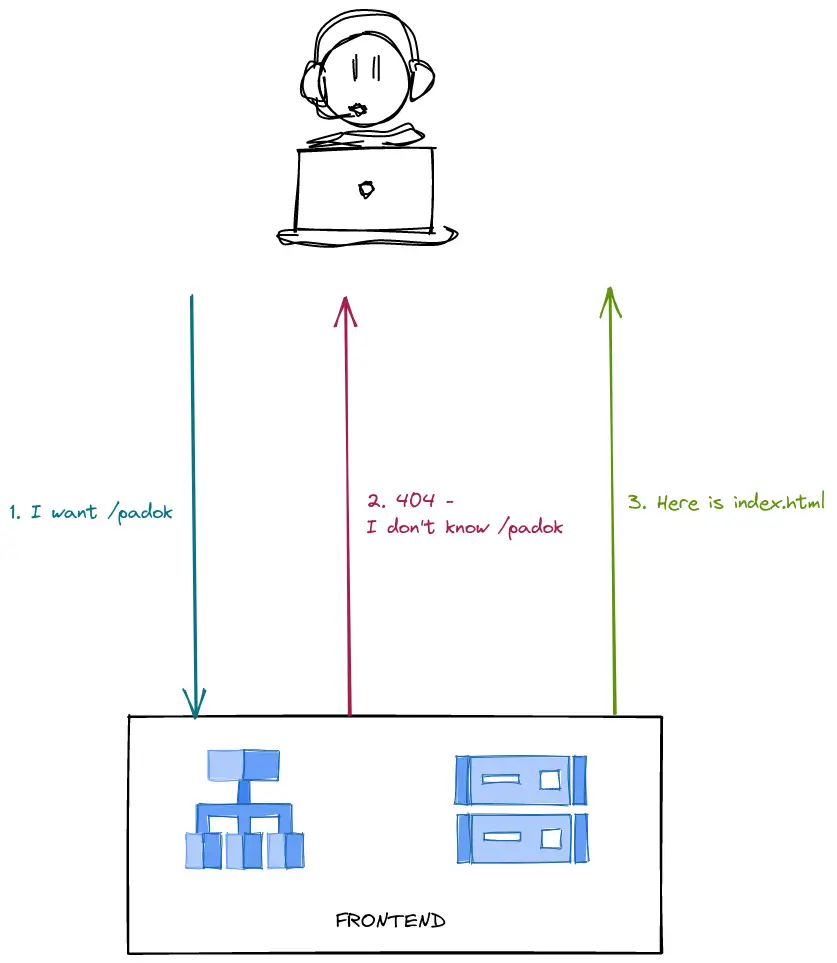
However, this means you get a 404 on every page of your website. This can affect badly your SEO. Worse, if you also have a smartphone application of your web application, getting a 404 on some specific routes can get you banned from deploying on the play store.
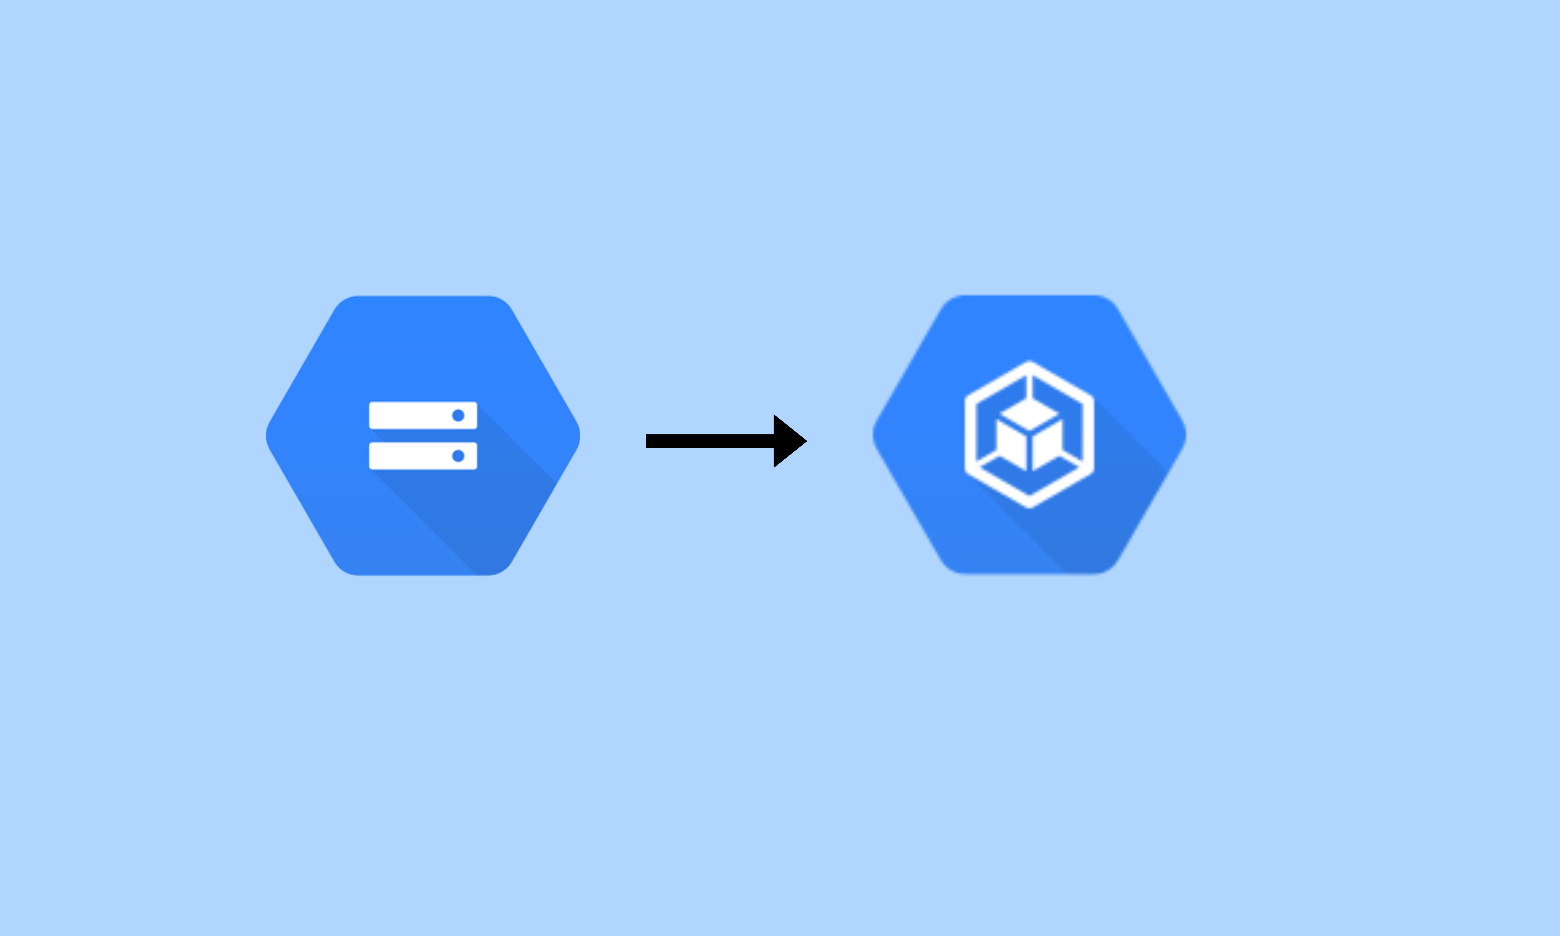
Before getting into the specifics, here is a representation of what we are going to do.

You should also know that this operation is not as easy as it sounds and it might take you a couple of hours to get it through.
CDN, load balancer, and proxy configuration
Why you should use a CDN: the issue of the rolling update
Well, first of all, even if you do not want to migrate your frontend to Kubernetes, you should use a CDN. Among other things, it will reduce your application latency.
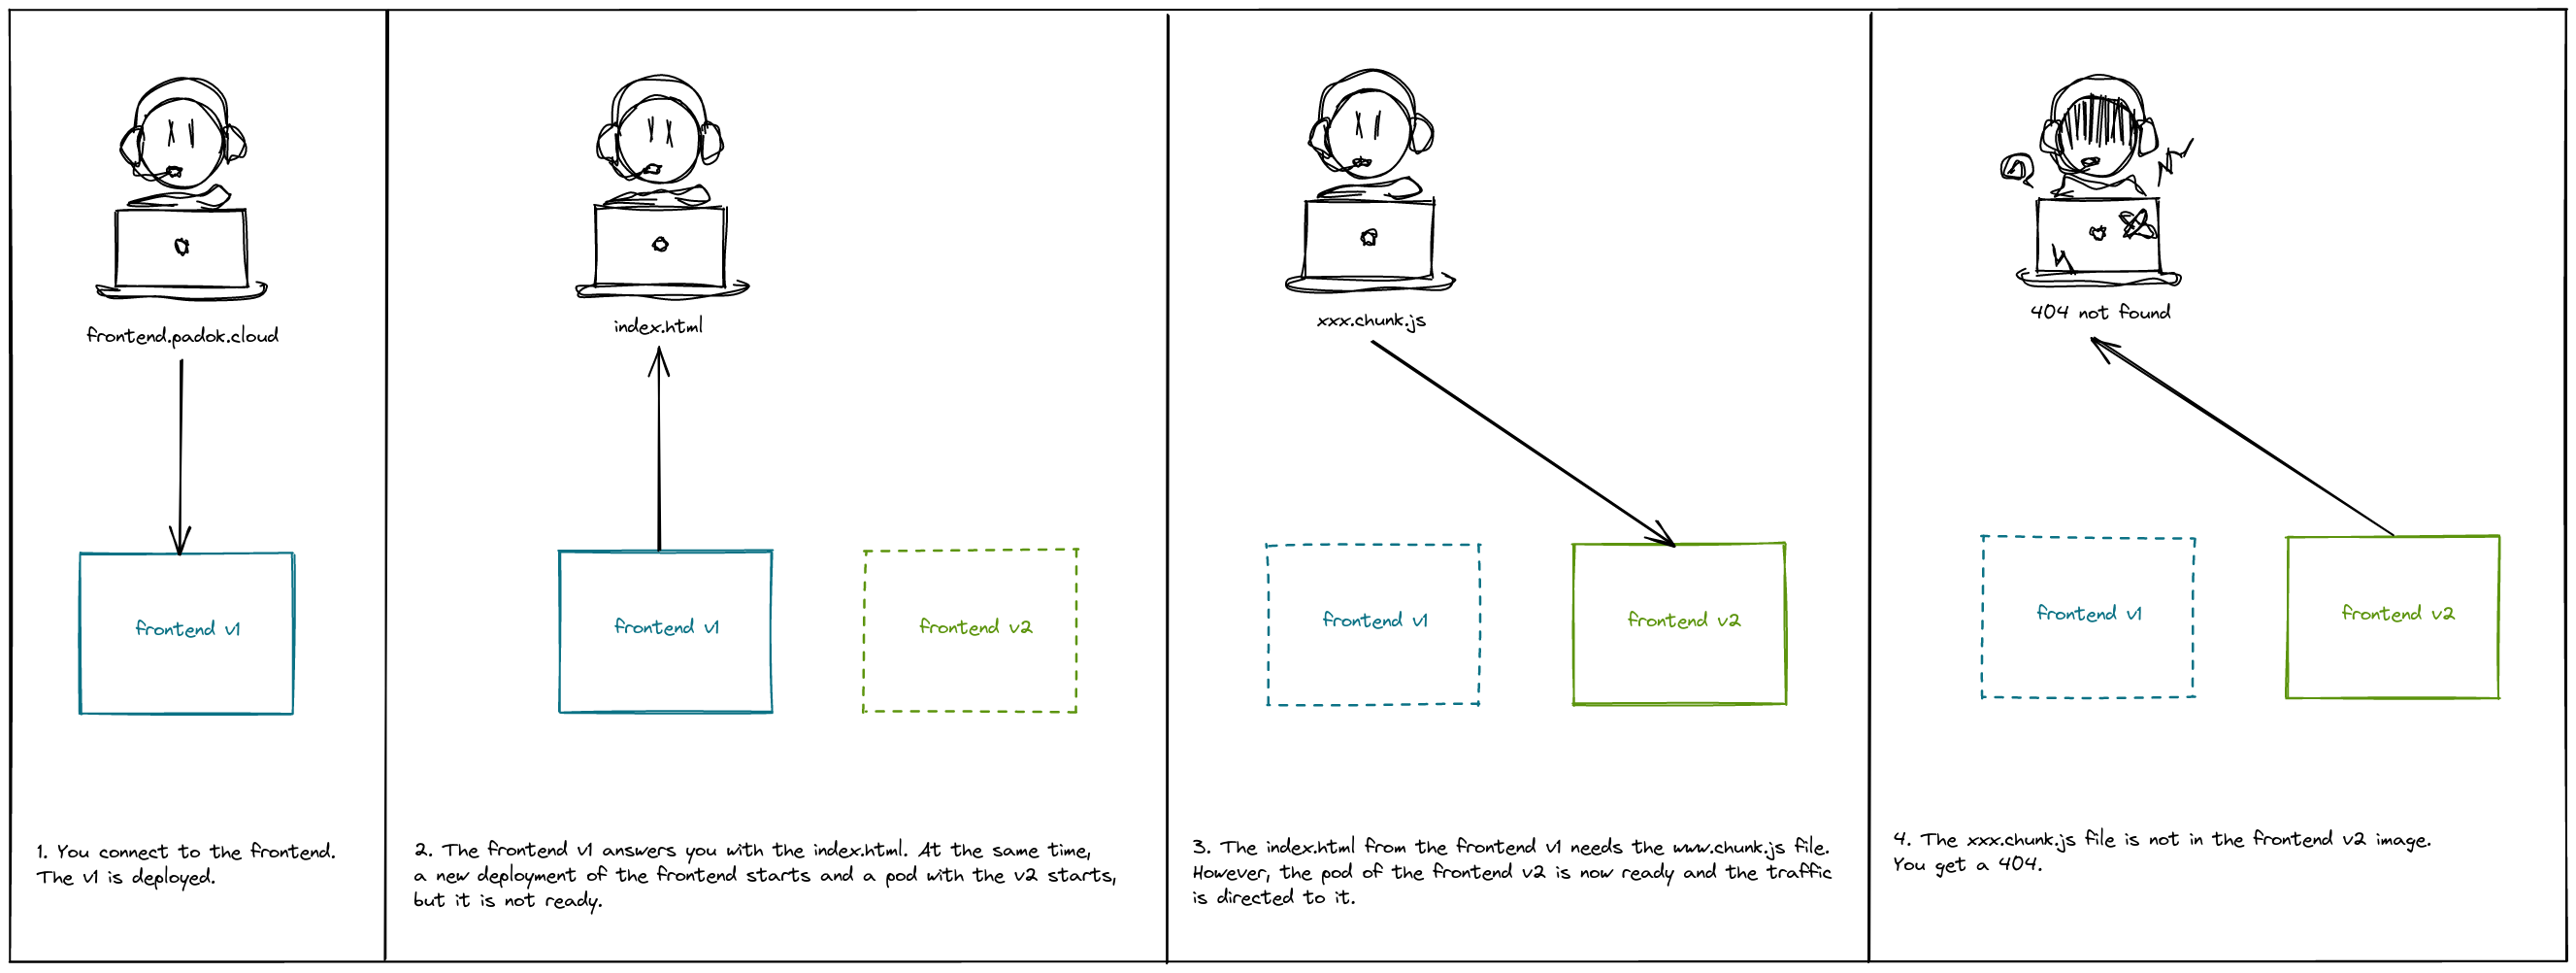
But, in the case of a Single Page application Frontend deployed in Kubernetes, it is mandatory: there is a possibility of race conditions for your end users when you deploy a new version through a rolling update. Here is what would happen:
- You connect to the website, and you receive the index.html of the first version. This index.html needs to receive another static file.
- A new version of the application is deployed. The static file you wanted does not exist anymore.
- You receive a 404. In the case of a javascript file, you will be left with a blank page.
This issue is illustrated in the next illustration.
N.B. You can encounter the same issue if you do not keep all the static files in your bucket. But usually, you copy those files without deleting the older ones so it is a non-issue.
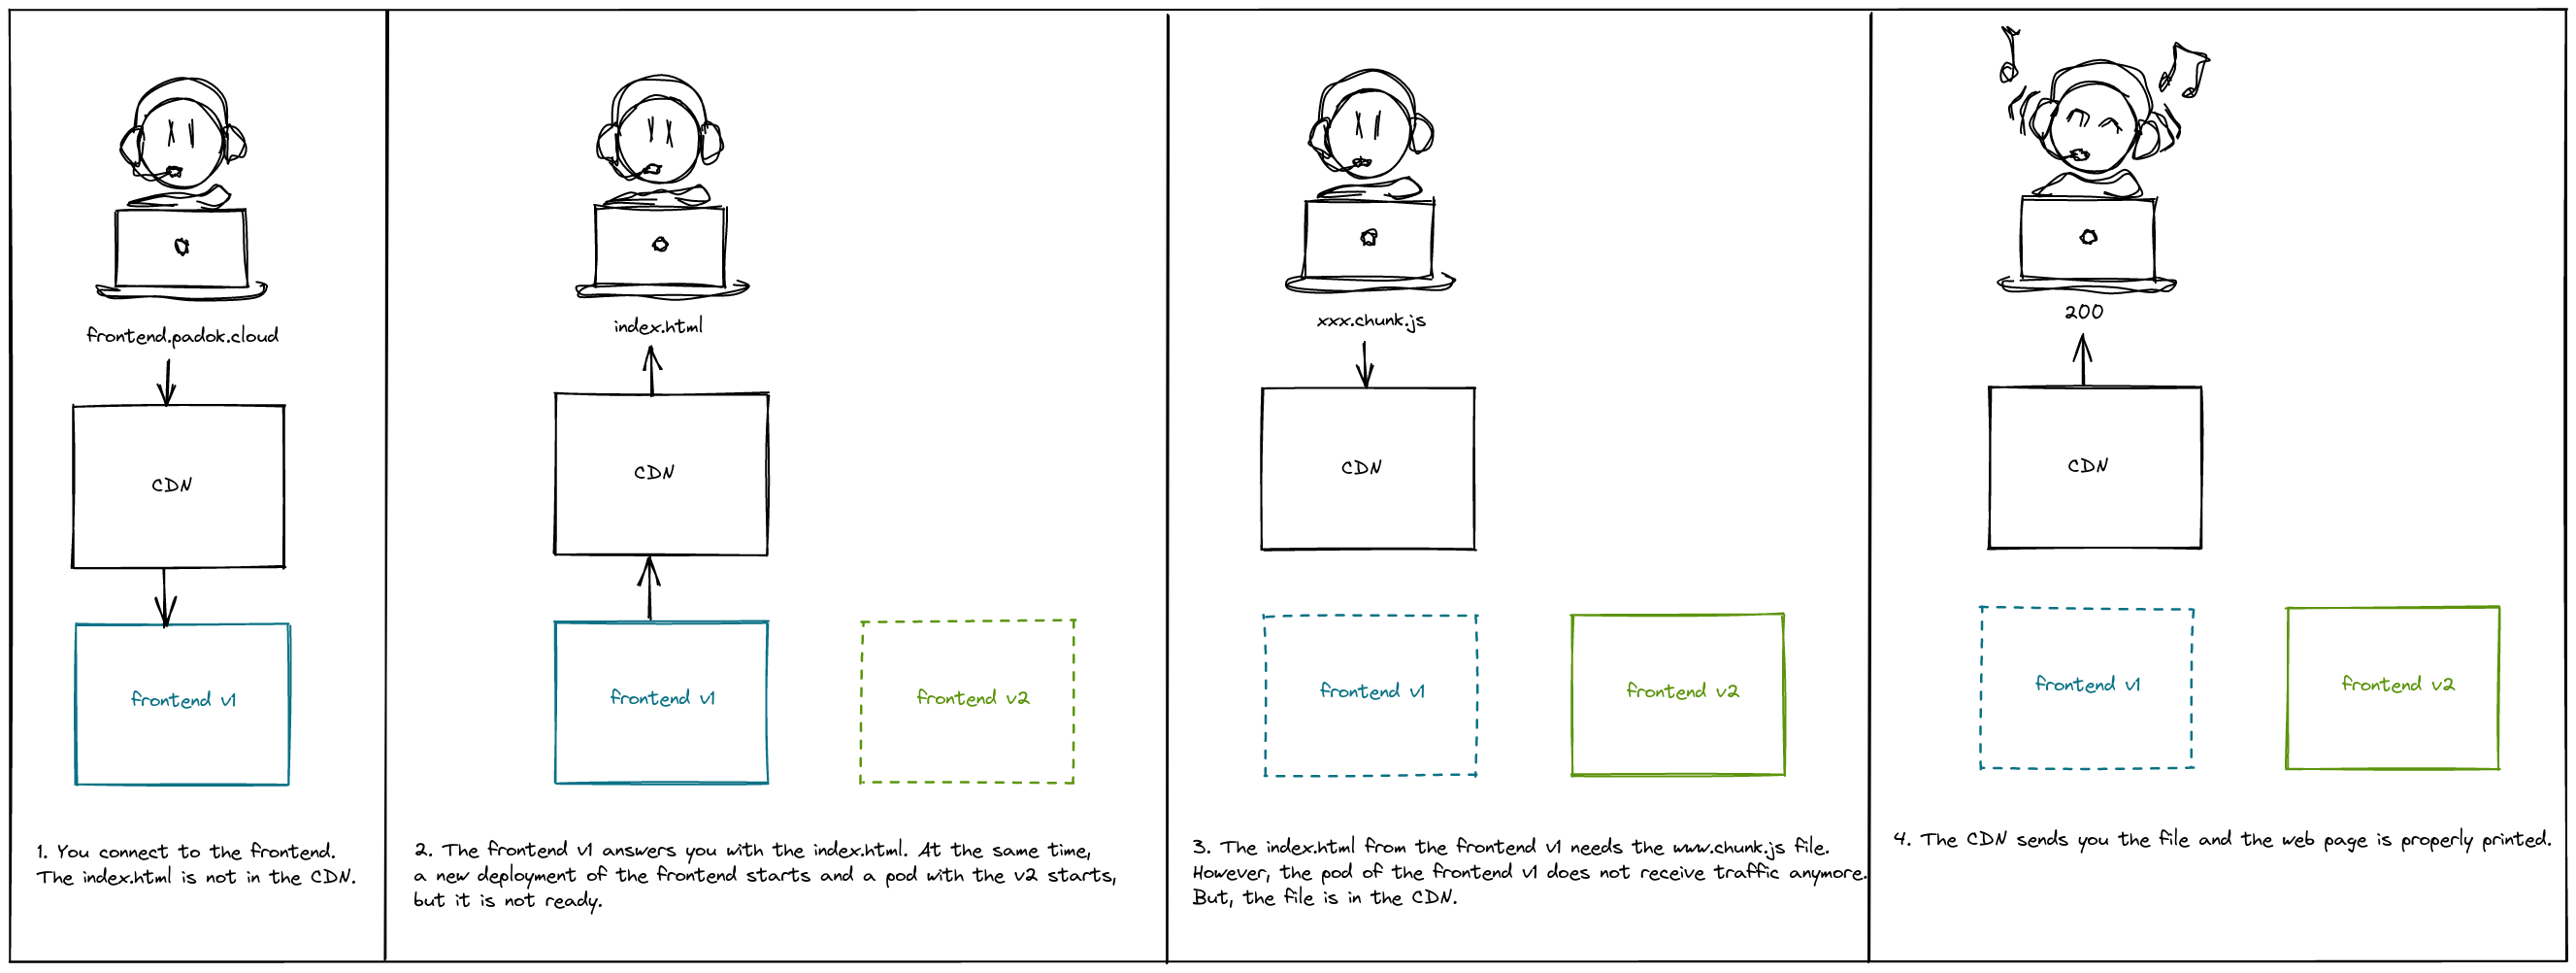
When you use a CDN, all the static files will eventually be cached. Thus, during and after the rolling update you will still be able to access your static files even if this file does not exist in any pod anymore, as shown in the illustration below.
Load balancer configuration from your Kubernetes cluster
A known limitation of GKE and the GCP load balancer, is that you cannot configure multiple load balancer backend from your Kubernetes cluster. Since you probably do not want CDN on your already existing Kubernetes workloads, nor the same caching policy, you will need a specific load balancer. The good news is, that since you are migrating from GCS, you already have a specific load balancer for your frontend. We will just create another one. Then you can delete the old one.
You can create a load balancer from a GKE cluster through an ingress annotation.
kubernetes.io/ingress.class: "gce"You will also want to use a reserved IP address. The easier is to reserve a new one and delete the old one after the migration. To attach your newly reserved IP address to your load balancer use the following annotation in your Ingress:
kubernetes.io/ingress.global-static-ip-name: "<new-ip-name>"
The use of a certificate
If you are using a cert-manager with DNS challenge, you will not need the next paragraph. In any other case, you might want to read it 😉
For an HTTP challenge, your DNS record needs to point to the right IP address. Since it will not be the case until after you switch your DNS record, you cannot validate a certificate before the end of the migration. But you want to. Fortunately, you can validate a GCP certificate for your current DNS record. Once it is validated, you can link it to your new load balancer with the next annotation:
ingress.gcp.kubernetes.io/pre-shared-cert: "<already-validated-certificate>"💡Tip: use the next annotation to enforce HTTP to HTTPS redirection.
kubernetes.io/ingress.allow-http: "false"CDN configuration from your Kubernetes cluster
At this point, you have a load balancer with a reserved IP and a certificate. But you need to configure your CDN. It is done with a BackendConfig CRD.
apiVersion: cloud.google.com/v1
kind: BackendConfig
metadata:
  name: frontend-backend-config
spec:
  cdn:
    enabled: true
    cacheMode: USE_ORIGIN_HEADERS
    negativeCaching: true
    negativeCachingPolicy:
    - code: 404
      ttl: 1
    serveWhileStale: 86400
Let’s break down some of this resource configuration.
spec.cdn.cacheMode: USE_ORIGIN_HEADERSmakes your origin set the caching policy through headers. We will configure it in a minute.spec.negativeCachingPolicy.ttlis for setting the TTL for a specific HTTP code result. In this case, we would want something like “Alway revalidate”. With the GCP API, it is possible to do it by setting the TTL to 0. But, with this resource, we encounter the same issue as with Terraform. So we set it to 1 second.
N.B. Before the 1.23 release of GKE, those parameters were not available in the BackendConfig CRD
Now, we need to attach this BackendConfig to your load balancer. Actually, we will not attach it to the load balancer but to the network endpoint group of your frontend. This is done through an annotation on your Kubernetes Service serving your Frontend application.
Now, we need to attach this BackendConfig to your load balancer. Actually, we will not attach it to the load balancer but to the network endpoint group of your frontend. This is done through an annotation on your Kubernetes Service serving your Frontend application.
cloud.google.com/backend-config: '{"ports": {"80":"frontend-backend-config"}}'And voilà!
Configure your NGINX proxy
To serve your frontend from a Kubernetes pod, you will need a proxy server. In addition, this server must add the headers for the usage of CDN. Here is what it looks like with NGINX.
server {
  listen       8080;
  server_name  _;
  root   /usr/share/nginx/html;

  location / {
    try_files $uri $uri/index.html /index.html;
    add_header Cache-Control "no-cache, no-store, max-age=0, must-revalidate";
  }

  location ~* \.(jpg|jpeg|png|gif|ico|css|js|svg)$ {
    add_header Cache-Control "public, max-age=86400";
  }
}
The location / is for your index.html. The try_files statement is the one that redirects every page to index.html, without returning a 404. The add_header statement is for adding the headers of your cache policy. For your index.html you do not want to cache. Indeed, after you deploy a new version of your frontend, you do not want to wait for cache invalidation for your application to be served.
The next location statement is for your static files. That is why we had a header for cache control which will keep the files cached for 86400s, or 1h. You can change the value if you need to.
💡N.B. For better application performance, enable gzip in your NGINX configuration as follows
http {

  <...>

	gzip on;
	  gzip_static on;
	  gzip_comp_level 9;
	  gzip_min_length 256;
	  gzip_proxied any;
	  gzip_disable msie6;
	  gzip_vary on;
	  gzip_buffers 16 8k;
	  gzip_types
	    application/atom+xml
	    application/geo+json
	    application/javascript
	    application/x-javascript
	    application/json
	    application/ld+json
	    application/manifest+json
	    application/rdf+xml
	    application/rss+xml
	    application/vnd.ms-fontobject
	    application/wasm
	    application/x-web-app-manifest+json
	    application/xhtml+xml
	    application/xml
	    font/eot
	    font/otf
	    font/ttf
	    image/bmp
	    image/svg+xml
	    image/vnd.microsoft.icon
	    image/x-icon
	    text/cache-manifest
	    text/calendar
	    text/css
	    text/javascript
	    text/markdown
	    text/plain
	    text/xml
	    text/vcard
	    text/vnd.rim.location.xloc
	    text/vtt
	    text/x-component
	    text/x-cross-domain-policy;
}
About the build and environment variables
Build a docker image
Good news! If you have already a CI/CD pipeline for deploying your frontend in a bucket, the Dockerfile you want to add to a pipeline is fairly easy. Here is an example.
FROM nginx:1.21

COPY nginx/nginx.conf /etc/nginx/nginx.conf
COPY nginx/default.conf /etc/nginx/conf.d/default.conf

COPY web/dist /usr/share/nginx/html

EXPOSE 8080
N.B. replace web/dist with your build directory.
If you do not have an already existing pipeline, I recommend you build one. But that is not the point of this article. In that case, you need a slightly more complicated Dockerfile, which you can create with a multi-stage build to keep your image as lightweight as possible.
The issue of environment variables
Usually, when you build a single-page application frontend, you have to give your build environment the environment variables needed to run the application. Thus, your environment variables are built into the application. This poses an issue: your environment variables are probably not the same between your different environments (production, staging, development…) and your build is different. This will make your Docker images different for each of your environments which is not desirable. Indeed, with the Kubernetes environment, we use trunk-based development more and more. Why? Well, this allows you to use the same Docker images in your different environments. Thus, when you test an application in a given environment, you are sure it is going to behave the same way in another one. In our case, it is not possible if the environment variables are built into the application itself.
So, you need to be able to source your environment variables at runtime. By doing so, your build will be identical in your different environments.
N.B. To do so, you will probably have to get a configuration file in your browser. Do not forget to change the cache control headers for these files in your NGINX configuration because you do not want to keep them cached. If you are using a config.js file, you need to add this to your server configuration:
location /env-config.js {
  add_header Cache-Control "no-cache, no-store, max-age=0, must-revalidate";
}
The sizing and load testing
At this point in the article, you know how to build your frontend, and configure your proxy, CDN and load balancer. So, you are almost good to go for your deployment. But, you now need to size your application.
In my case, with a React application, here is what I learned while sizing the limits and requests of my pods:
- The application will never use more than 10m CPU and 20Mi of memory. However, you need to set at least 100m CPU and 128Mi memory for requests. Why? Because CPU and memory consumption in Kubernetes is computed over time, it is not really precise, especially with values. If your requests are too low, your application will get throttled.
- You can not use the average CPU usage or average memory usage to set up horizontal pod autoscaling. Indeed, there is no observable variation of those metrics in this case. If you to set up autoscaling, you need to use Prometheus and expose custom metrics for your HPA, or something similar.
- If you do not have the possibility to do so, set a high number of replicas by default…
Also, before ending your migration, meaning doing your DNS switch, you might do some load tests in order to check if your application has good enough performance 😃.
N.B. In NGINX, an important factor of performance is the number of allowed worker processes. You can change it in your NGINX configuration as follow:
events {
  worker_connections 8000; # defaults to 512
}
Conclusion
Migrating a frontend from a bucket to Kubernetes might sound like a fairly simple task. But there are a lot of things you need to know beforehand. With this article, you should know everything you have to know to perform a migration from GCS to GKE effortlessly 🎉