As a developer, using the Cloud can often feel like a “magical” experience: you write a bunch of terraform code or click on a bunch of buttons in a more or less friendly UI and POOF! A VM with the specs and operating system of your choice is ready to use. Truth be told, this is far from being magic, and the VM is not summoned into the world through a portal. The system is a complex one, designed by arcane-level tech wizards, but it is quite real and practical. In this article, I will take you behind the scenes to show you what actually happens when you summon a VM. So, if you want to understand cloud machinery or improve your tech skills, tag along with me on this journey!
Hypervisors and automation
First, let me clear something up: I will be talking exclusively about the lifecycle of VMs in this article. This is for a very simple reason: all cloud services rely on VMs to work. There are services that are labelled as “server-less”, like AWS’s Lambdas or Google’s Cloud Functions, but this only means that the cloud provider will manage these servers in your stead. The code has to run somewhere, right? Google’s Cloud Functions for example use a framework called knative to execute your functions in a Kubernetes cluster. A Cluster needs nodes on which to run. And you guessed it, these nodes… are VMs.
How and where do these VMs run? “In the cloud” is no acceptable answer of course!
They run in the data centers of the cloud providers, on physical servers called Hypervisors: huge machines with a lot of computing power built and optimized to run virtual machines.
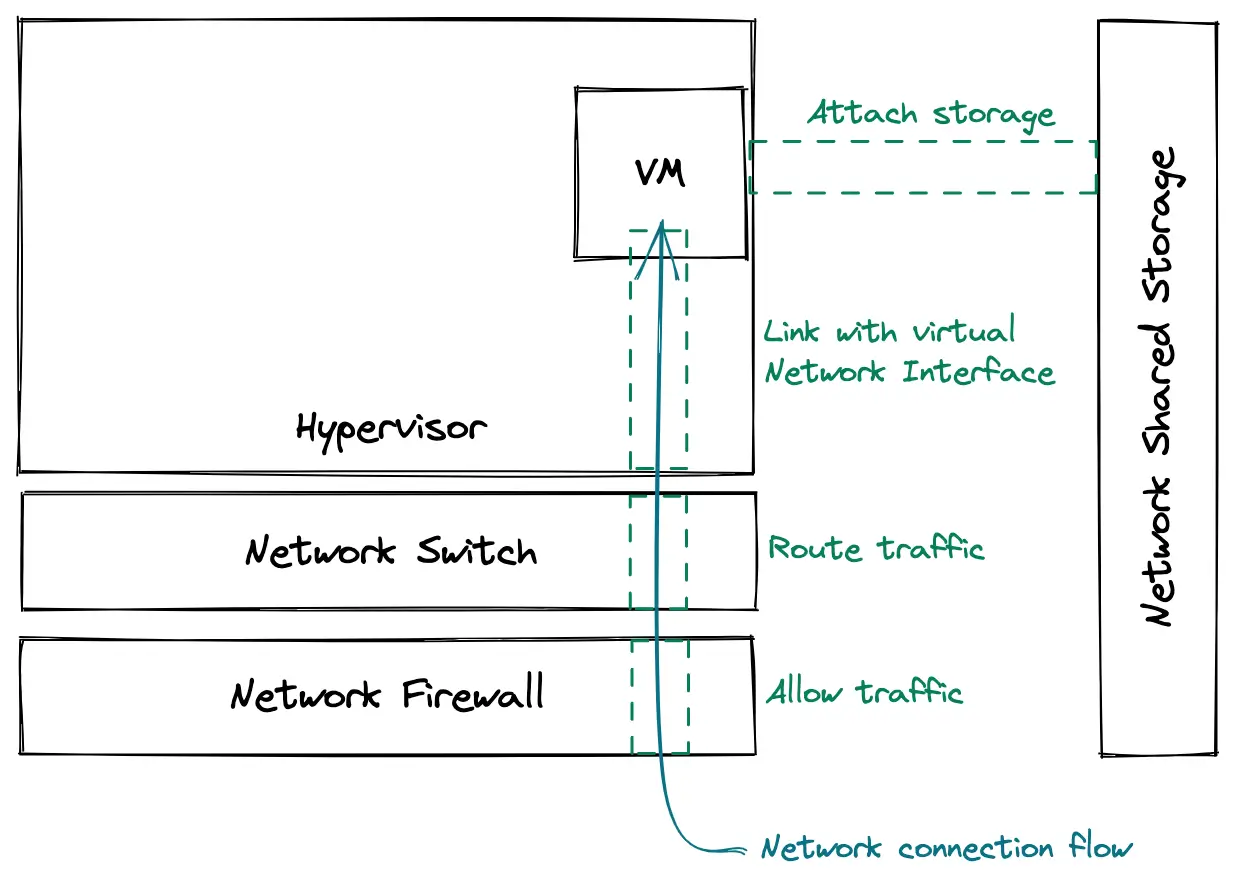
Nowadays, almost any machine is able to run a virtual machine, so doing this on one’s laptop is totally doable. There are many software solutions to do this, to name but a few: Vagrant, kvm, Virtualbox, qemu… If you have ever run a VM locally, you know that there can be quite a few things to configure on your PC to be able to use a VM: create a virtual disk, create a virtual network card, configure a virtual network, connect the VM to this network, and maybe forward some ports from your local network to your VM. This is all configuration that has to be done “on the outside” of the VM. Once this is done, all the other components with which the VM interacts have to be configured as well: allow inbound traffic through new firewall rules, route the traffic properly to the VM, and assign an IP to the VM… And finally, you can log into your VM and configure it from the inside.
All these tasks can be long and tedious to do for each VM, especially if you are a major cloud provider and plan on running millions of VMs in the whole world. This is why a high level of automation is also behind the magic of providing VMs out of thin air. I will not go into detail of how cloud providers automate all of this in this article, but if you are interested in the subject, check out the Openstack project, an open-source cloud management software. Also, stick along to the last part where we will take a look from the inside of a VM, to discover how some things are built around it.
Configuration on boot: cloud-init to the rescue
So when I ask for a VM, it is created, prepared, and its environment is updated for it to be accessible and usable. At this point, the VM “exists”, and is ready to boot. Once booted, it is magically ready to be used… right?
Well, kind of. But upon booting, some additional configuration happens inside the VM, which is part of the whole magic. For example, it needs to allow SSH connections from specific SSH keys.
For the VM to be configured when it finishes booting up, there are two options:
- Tell the VM how it should be configuring itself from the outside
- Have the VM figure out its configuration on its own
The second option is the most scalable one and is the one that is implemented in all cloud providers. To achieve this, cloud-init comes in very handy.
What is cloud-init? Well, the description on the home page is very explicit, so I recommend you have a look at it 😉
Basically, it is a piece of software that will initialize a device on boot, configuring things like the network, storage devices, SSH keys… It is able to fetch its configuration from external sources as well, which makes it very versatile (more on that a bit later).
If you are like me and need to fiddle with tools to understand how they work, this article will guide you to set up a Vagrant VM to test your cloud-init config.
The cloud-init docs also give quite a few examples of common configurations, which can be very practical. I will mention one here so that you see what it looks like, but do not hesitate to check the docs out!
# This is an example file to automatically configure resolv.conf when the
# instance boots for the first time.
manage_resolv_conf: true

resolv_conf:
  nameservers: ['8.8.4.4', '8.8.8.8']
  searchdomains:
    - foo.example.com
    - bar.example.com
  domain: example.com
  options:
    rotate: true
    timeout: 1
Obtaining Metadata
You probably noticed: when deploying a VM, you have never been asked to provide a cloud-init config file. At most, you have had to provide a launch script for your instance, but not a full YAML description of your machine.
I mentioned earlier that cloud-init is able to fetch its configuration from an external source. In the cloud, each provider has metadata servers that act as the source for all of the cloud-inits configurations (and much more !). That way, when booting, the VMs just poll the metadata server and use the intel they get to configure themselves. This is highly practical because it means every VM is configured with a standard interface, and that a VM’s metadata can be updated by multiple sources:
- IAM services can provision users, SSH Keys or the VMs service account tokens
- Network services will provide the proper network configuration
- Users can provide launch scripts
The VM communicates with the metadata server over HTTP and talks to it at a specific IP: 169.254.169.254. This IP is a link-local address, which is a special IP address range: no packet sent to or from this range is forwarded by network routers. All packets stay in the local network. At least, this is the default behaviour for most routers.
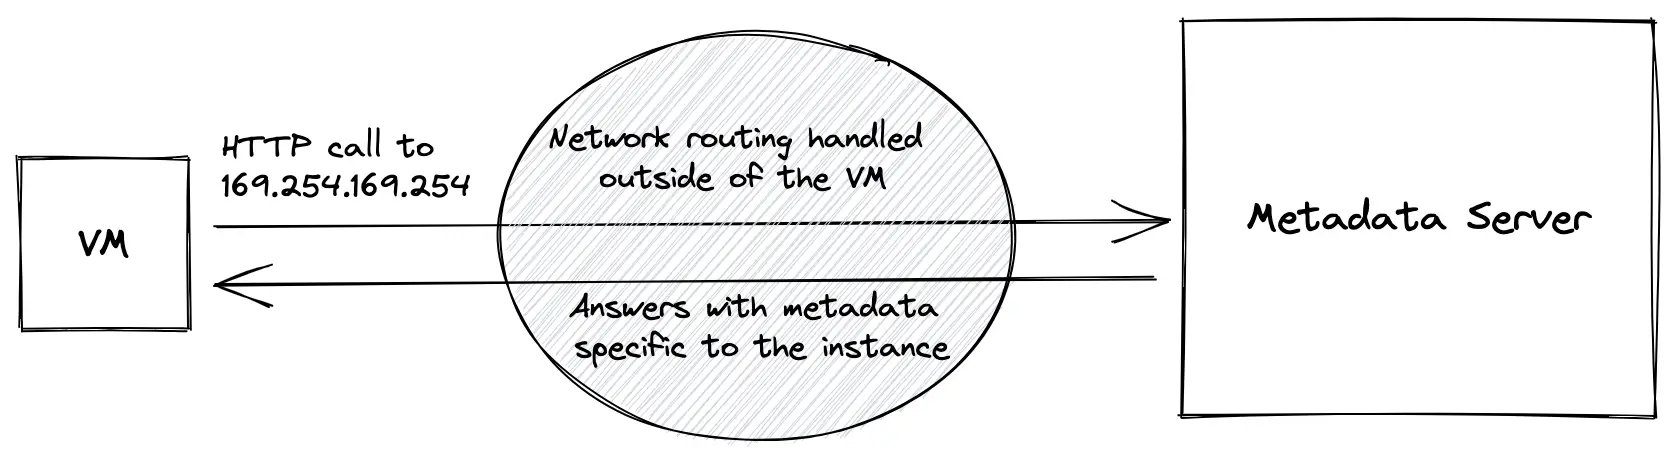
This is the most “magical” part of all of what we have seen today. I strongly suspect that cloud providers have some special routing in place for TCP packets sent to this specific IP, otherwise, they would not reach the metadata server at all. This part is a true black box, it is not documented at all by Amazon, Google, or Microsoft, so we can only analyze it from a VMs point of view and try to reverse-engineer its inner workings.
The VM talks to the metadata server over plain HTTP, without providing any credentials. This means anyone who gets access to the node can read its metadata. For example, on GCP you can spin up a VM and run the following command to get the tags of the VM :
# metadata.google.internal resolves to 169.254.169.254

curl "http://metadata.google.internal/computeMetadata/v1/instance/tags" -H "Metadata-Flavor: Google"
Without providing any identification of your VM, the metadata server responds with information specific to your VM only! Magical, isn’t it? Does it identify your VM via the MAC address of the virtual network interface card? Or via the source IP? This is unclear and is probably a “secret ingredient” that cloud providers will not disclose so easily. What we do know, is that it is not possible to grab another VM’s metadata from a given VM.
Conclusion
I hope this introduction to finding out how VMs are provisioned in a cloud setup has helped you in getting a better grasp of how the machinery works behind the scenes. As you have probably noticed, the way the metadata server works identifies VMs, or how the traffic is routed from the VM to the metadata server is still unclear. If you have any information or a hypothesis you want to share, or simply want to discuss the subject, don’t hesitate to reach out, I would love to chat about it!